
K&S Ball Bonder
Table of Contents
K&S Ball Bonder Operation Manual
This manual describes a brief operational overview and common troubleshooting tips for the K&S Model 4524 Wire Bonder in the NSERL Cleanroom at UTD.
1.Reserve time on the tool using the Cleanroom Scheduler. You must be trained on the tool in order to have scheduling privileges. There is no log book for the tool.
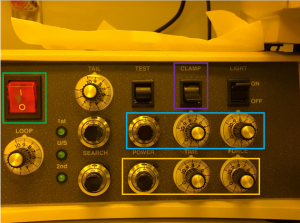
Figure 1. An image of the left control panel. Switches and knobs that are relevant to this training are outlined, including power (green), clamp (purple), power, time, and force for the 1st and 2nd bonds (blue and yellow, respectively)
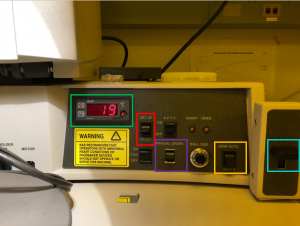
Figure 2. An image of the right control panel. Knobs, switches, and levers that are relevant to this training are outlined, including workholder temperature control (green), setup/reset (red), manual spark (purple), semi auto/man Z operation (yellow), and manual Z control lever (blue)
2.Turn on red switch to power on the instrument, the lamp, and the heated workholder. Do this about 20-30 minutes prior to using the tool to allow the temperature of the sample holder to equilibrate. Please take into account this warm-up time when you make your tool reservation.
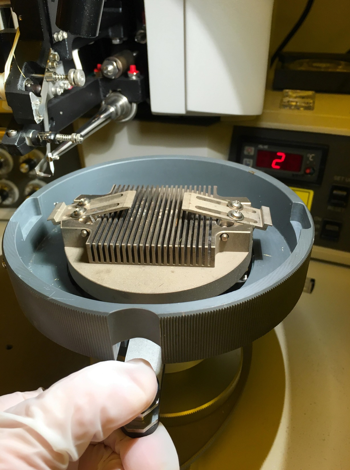
Figure 3. An image of the heated workholder. Pinch the lever to release the clamps while loading or unloading a sample.
3.Move the workholder to the right, so that it is out of your way. Clamp your sample to the workholder to allow it to come to temperature.You may use silver paste to bond a chip/die to a package
4.Look through the microscope eyepiece. Use coarse and fine focus to adjust view of the capillary tip

Figure 4. Image of the left side of the microscope, with coarse and fine focus knobs indicated with red arrows
5.Verify that there is gold wire passing through the capillary tip
6.If there is no wire in the tip, carefully feed wire into the tip.
- Move the reset/set-up switch to set-up. Flip the clamp switch to the up position to open the clamp.
- Using tweezers, grab the end of the wire. If the end of the wire is bent or curly/wavy, use the thumb and forefinger of the opposite hand to pull off the end. The fresh end of the wire should be straight. You cannot force a bent or curvy piece of wire to feed into the capillary.
- Pass the wire through the capillary. The wire goes behind the hook and in between the prongs of the clamp before passing into the capillary
- Flip the clamp switch down to close the clamp. Move the reset/set-up switch down to reset and then to the middle position.
- Trim off excess wire from the capillary tip and form the wire ball. Press the button to move the NEFO (Negative Electric Flame Off) wand close to the gold wire, without touching it. Press down on the Spark switch, and quickly release
UPDATE: You can trim excess wire from the capillary tip without moving the NEFO wand. If you are generating “open” conditions, try to trim the wire without pressing the button to move the NEFO wand
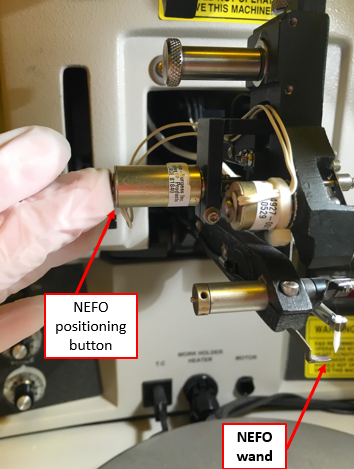
Figure 6. Image of the bonding head, with the NEFO wand and positioning button indicated
6. If you do not do this carefully, the wire will touch the wand. This creates an open circuit. To clear this, reset the tool, or turn it off and back on again. The “open” must be cleared in order to operate the tool
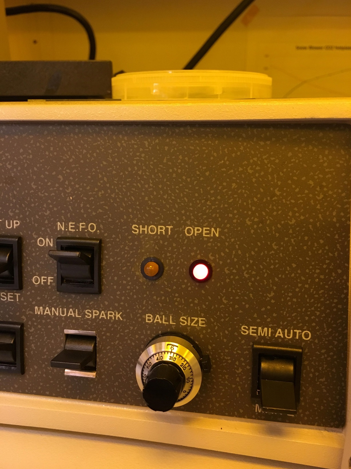
Figure 7. An image of the right control panel, with the open LED illuminated, indicating the open circuit condition. The tool will not operate in the open or short circuit condition.
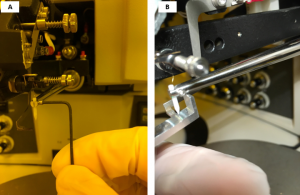
7. The Spark switch may also come out of the tool if you press down too hard. You can simply push it back into its spot.
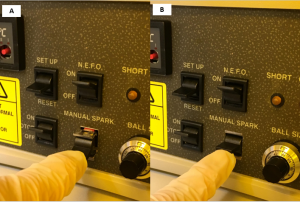
Figure 8. Image of the manual spark switch. In (A), the switch has become dislodged from its location, but it can be gently pushed back in, as shown in (B).
7. Verify that the green “1st” light is on.
- If the “2nd” light is on, reset the tool. The “U/S” light will briefly turn on, the “2nd” light should go out, and the “1st” light will come on
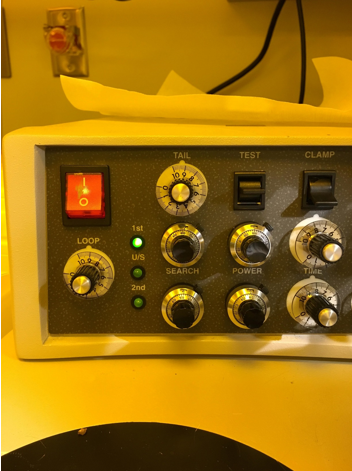
Figure 9. Image of the left control panel, with the 1st LED indicator illuminated. Ready to bond!
8. Move the sample stage under the bonding head. Using the microscope eyepieces, find the location of the first bond pad. Move the workholder manually with your hands, or make small adjustments with the mouse. Lower the bonding head about 75% of the way to the sample surface to verify the capillary tip will land on the bond pad.
9. Verify the tool is in Manual Z mode. You are now ready to make bonds!
10. Press the black manual Z control lever all the way down slowly. When the tip touches the surface, you should hear the tool make a clicking noise. Slowly release the lever.
11. Using the microscope, verify that the new wire bond to your substrate. Move the workholder to line up the location of the 2nd
12. To make the second bond, press the manual Z control lever all the way down slowly. When the tip touches the surface, you should hear the tool make a clicking noise. Slowly release the lever.
13. The tool should automatically cut the wire from the substrate and form a new ball with the NEFO want. Verify that the “1st” light is now on, and you may prepare to make a new bond.
14. When you are through, make sure wire is in the capillary for the next user, and turn off the tool.
Common Troubleshooting
- The clamp closed while I was feeding wire into the capillary!
It’s ok! The clamp will automatically close after being open for a few minutes, even if the tool is in “set-up” mode. If this happens, move the clamp switch into the closed position, and move the reset/setup switch into reset. Then you may move the switch into set up, and move the clamp switch into the open position. You will get quicker at feeding the wire into the capillary with practice!
- I can’t feed wire into the capillary!
The capillary tip is clogged by fragments of gold wire. Use the small Allen key in the tool box to loosen the screw that holds the capillary in place. Locate the pack of “unplugging probe” needles.
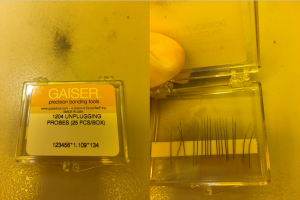
Figure 10. An image of the unplugging probes. The package of probes is stored in the toolbox.
Grab a probe with a pair of tweezers. Holding the capillary tip in between your index finger and thumb, use the tweezers to gently push the probe into the wide end of the capillary. You may not be able to see the tip of the probe or anything being ejected from the tip of the capillary, but this does clean debris from the capillary. Return tools to the toolbox, and reinstall the capillary tip when you are through!
- I can’t open the clamp!
Is the tool in an error state? Or, is the 2nd indicator light on? You cannot open the clamp if the “open” or “short” indicator light is on, or if the tool is in position to make a 2nd bond. Clear an open or short by turning the tool off and on. Return the tool to 1st position, by moving the reset/set-up switch to reset and returning it to the middle position.
- I can’t make bonds!
There are many variables involved in making bonds. Here is a checklist of things you can check to make strong bonds.
Easy to check
Is “open” or “short” indicator light on? You cannot operate the tool in this state. Turn the tool off, and turn it back on
Is the heated stage on and heated? The baseline bonding process in the cleanroom heats the stage and samples to 150C. A previous user may have changed the temperature. If your sample can tolerate 150C, you can adjust the temperature. Press the red button, adjust the temperature with the up/down button, and press the red button again.
Is the capillary tip broken or damaged? The capillary can wear out over time. If the tip is not a smooth cone that presses down evenly on to a smooth planar surface, you may not be able to make bonds. If you suspect the tip is broken, replace it. Use the Allen key to loosen the Allen screw and remove the old tip. Obtain a new tip from the tool box, install it in the tool, and tighten the Allen screw. Use the small aluminum height gauge to check that the new capillary is installed at the correct height.

Figure 11. Images of new capillary tips. The tips are stored in cylindrical containers (A), and the tip is secured in the lid (B). Packages of new tips are stored in the toolbox. Old tips can be discarded in the trash.
I can’t tighten the screw! Frequent use of the tool and adjustments to the capillary will strip the threads on this screw. Replacement screws stored in the toolbox.
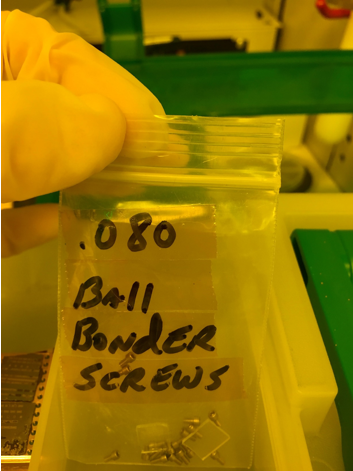
Figure 13. An image of the packet of spare screws. This is stored in the tool box.
Intermediate level of effort
Is your sample clean? Bonds do not have good adhesion to dirty surfaces. Verify that your sample bond pads are clean. Depending on your sample, you may try a solvent clean or an O2 plasma clean.
Is the workholder at the right height? You must work within the z-range of the bonding head in order to make bonds. To verify that you are working at the correct height, attempt to make a bond, so that the 2nd indicator is on. In the 2nd position, the capillary tip should just touch the surface of your sample. You may adjust the height of the workholder, by holding the stage in one hand and twisting the base clockwise or counterclockwise with the other hand. Do not attempt to adjust the height of the workholder while it is heated. Allow the workholder to cool before adjusting.
Advanced level of effort
What materials are you attempting to bond? Our baseline process is optimized to bond gold wire to gold or aluminum bond pads. You may consider switching your device fabrication to gold or aluminum bond pads
If changing the material is not an option, you may adjust tool parameters. As a user, you may change the ball diameter, the sample temperature, and the power, time, and force applied to make the 1st and/or the 2nd bonds. This is a last resort, as dialing in parameters for a new process tends to be more of an art than a science!