
UltaTech Mask Washer Operation
Table of Contents
Introduction
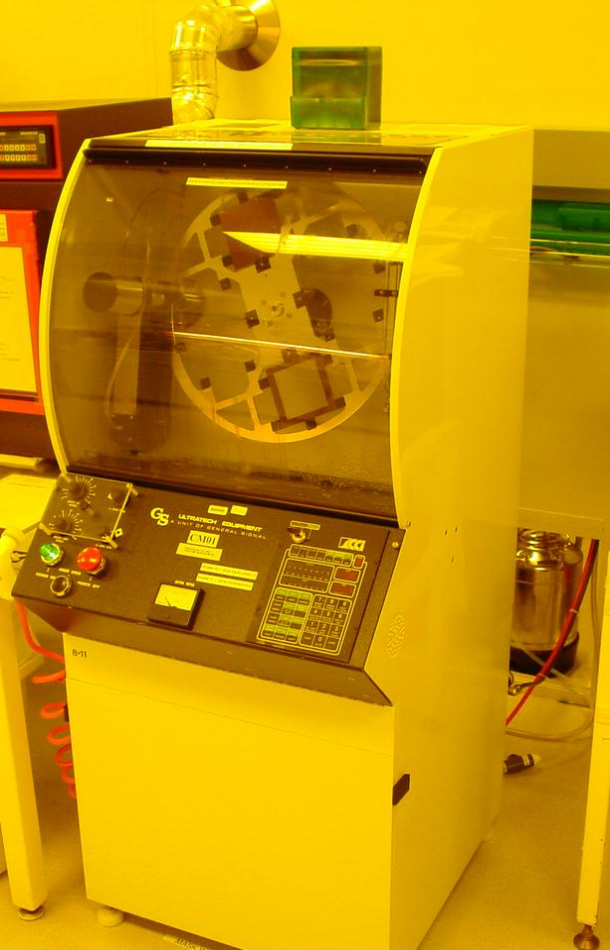
The UltraTech Model 605 mask Washer (circa 1987) donated to UTD by our friends at Texas Instruments, is a microprocessor controlled double-sided Mask Cleaner. The system uses high pressure DI water with pressure up to 2500 psi in a very small diameter jet to dislodge and wash off particles stuck to the surface of photomasks of 4×4 or 5×5 inch sizes. The programming consists of two pre-programmed sequences which allow the user to push the start button and walk away, and in 5 to 7 minutes come back and fetch their newly cleaned mask. Program “0” is a simple pressurized water clean and Program “1” includes a soapy brush wash cycle and final rinse with the program “0” high pressure wash routine.
Tool Description
The mask washer is designed to wash both sides of the mask at the same time with front and backside high pressure jets of electrically conducting DI water, (program “0”). The mask is mounted on a large rotating disc as shown in Figure 1. The large disc rotates and the water jet arms oscillate across the mask surface according to the programmed instructions. At the conclusion of the washing cycle, the water-jet arms continue oscillating, but now a jet of drying N2 is directed at the mask from the arms to aid in water shedding during the high speed rotation drying cycle.
The term “electrically conducting” De-ionized water means that ordinary “DI” water has been treated with CO2 (carbonated) to reduce the resistivity of the water without having undesirable metal ions doing the conducting. It turned out that in the initial mask cleaning development, high pressure, and high speed DI water rushing across the surface of the photomask created corona discharges at corners of the metal features on the mask because of the insulating nature of the water. These corona discharges caused lightning bolt type etching of the metal patterns destroying the fidelity of the mask. Therefore the carbonization of the water was instituted to defeat the destruction mechanism. We have implemented this feature in our mask washer.
We also implemented a soapy water wash in program “1” to dislodge insidiously stuck particles via surfactant reduction of the DI water surface tension. This program activates another oscillating arm having rotating brushes to lightly brush the mask while soapy water is fed to the brush through a piping system in the arm. This arm travels back and forth across the mask while the mask rotor is rotating at low speed. After the soap process is completed, the microprocessor calls the high pressure water jet program to do the final rinse.
Note, however, that the cleaning process is intended to remove particles – not chemically attached stains, blotches of resist, etc. If your mask is contaminated with photoresist or other material blotches, it might be prudent to wash these blemishes with a solvent that will chemically dissolve the defects and then execute a mask wash procedure.
The mask washer is shown in Figure 1 with descriptive labels. The upper chamber is the cleaning station; while behind closed doors in the lower section reside the high pressure water pump, the carbonization canister and the electronics that control the system. The soapy water is contained in a canister behind the wall that can be seen at the lower right in the photo. It is pressurized and delivers the soapy water when the controller opens the water valve. This canister can run dry after a number of soapy wash cycles. If no suds are formed during the soapy wash program, call a staff member to check and refill the soapy water canister. We use a special soap compatible with the contamination-free requirements of semiconductor processing.
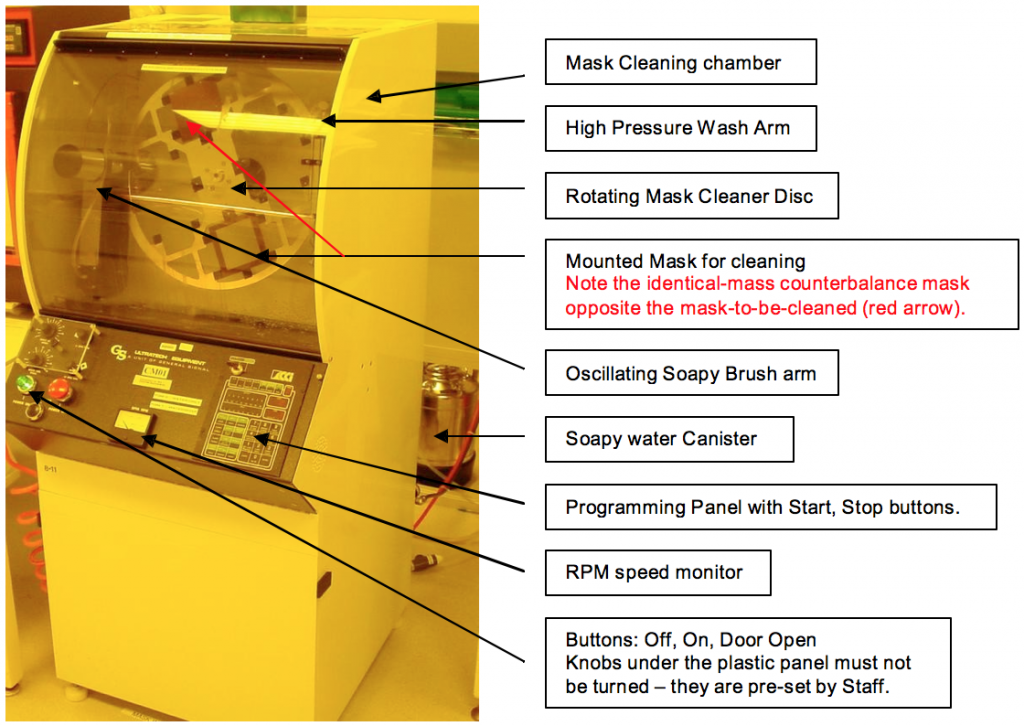
Figure 1. UltraTech Mask Washer showing the user interface features. The microprocessor, high pressure water pump and carbon Dioxide carbonator bottle is contained in the lower compartment. Note that an identical mass mask must be mounted opposite to your mask-to-be-cleaned; otherwise the rotor will be out of balance and a vibration sensor will stop the program. Normally a “dummy” mask is available at the machine for counterbalancing.
To operate the system, follow the steps below:
1. Open the upper chamber door using the “Door Open” button on the left side of the panel (Figure 2).
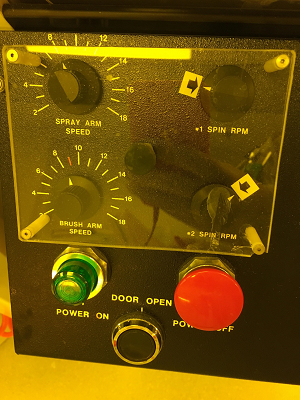
Figure 2. Note the Door Open black button at the bottom of the big button panel. Push the Door Open button and aid the door with your other hand to unlatch it. Lower the door and mount your mask.
2. Mount your mask in the appropriate size holding slot AND insure that there is a mask with the exact same mass in the opposite holding slot. That means that the counter balance mask thickness must be the same thickness as your mask- to-be-washed, otherwise the machine will vibrate excessively and shut down. After mounting the masks, close the door by pulling it to the top until it latches.
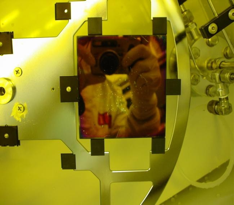
Figure 3. Mask Mounting. Place an edge of the mask in the inner, spring loaded edge clip (black rectangle at the left of the mask in the photo). Push the mask to compress the spring and then seat the opposite edge in the fixed clip at the right side of the mask in the photo. Make sure the top and bottom edges of the mask are seated properly in the support tabs. Check the counterbalance mask seating.
3. Select the desired program: “0” for high pressure water cleaning or “1” for soap scrub and high pressure water cleaning, Figure 4.
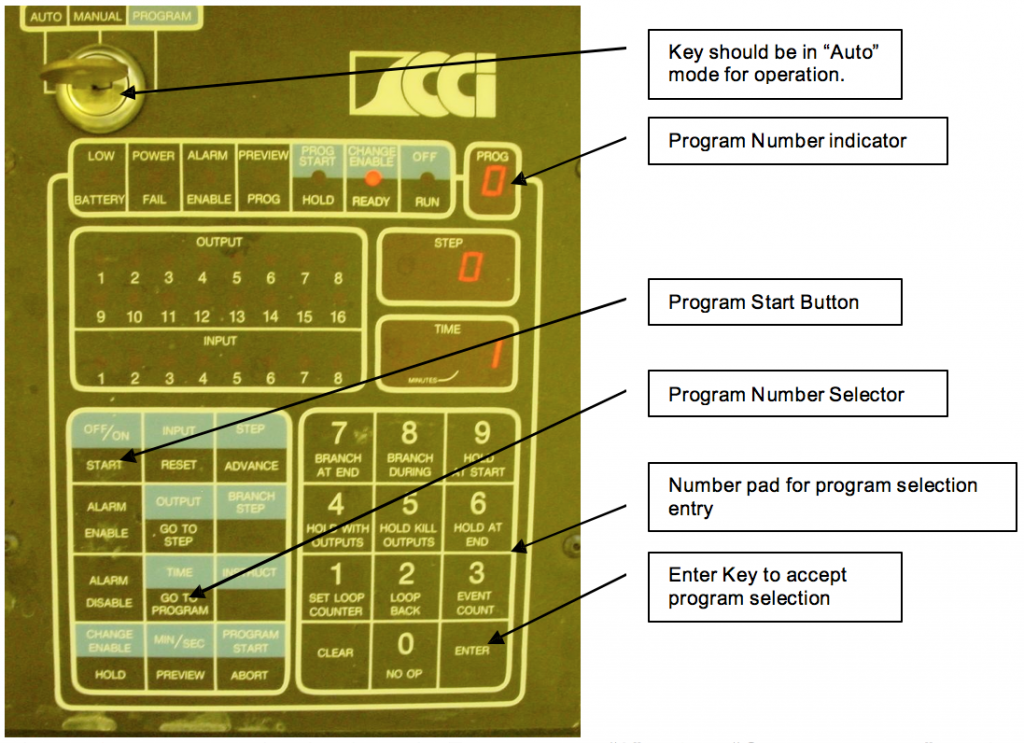
Figure 4. Programming keyboard. For program “0” select “Go to Program” on the keypad, select “0” on the keypad and then hit “Enter” to accept the selection. If “0” already appears in the “PROG” LED indicator, you do not have to go through the select steps. Note the two keypads: Left group and Right group – important in programming.
- To start the program, hit the Program “Start” button on the left side of the keypad.
- Wait. Program “0” takes about 5.5 minutes, and Program “1” takes about 7 min.
- When the program stops the rotating drum completely, push the “Door Open” button, lower the door, and remove your mask.
- Close the door when you are done.
Comments on Effectiveness of Cleaning
Photomasks in industrial settings are usually pristinely clean and only need to be cleaned if they pick up a few particles. However in the UTD Clean Room I have noted that masks become contaminated with fingerprints, resist splotches, scratches, tape glue and an amazing array of different contaminates. This machine is primarily designed to remove particles. If you note that you have these non-particle type contaminants, there is no harm in manually removing them with acetone and a gentle wipe with a swab and a subsequent rinse with Acetone, and/or IPA. A final cleanup in the mask washer would then be more practical. Neither soap nor high pressure water will remove photoresist that has dried on the mask – Acetone will.
Another practical issue is that if the soap brushes have not been used for a long time, they will leave dried specks of soap on the mask during the first several soap wash cycles. Therefore you may want to run a couple of soap wash cycles on a pair of dummy masks before cleaning your mask with the soap process.
Conclusion
This manual has described the basic operating procedures for the normal user. Detailed programming will be described in another document. Normal users do not need to program the system. The Appendices record for reference, programming logic and data contained in the currently active programs.
Appendix A
In the Program Mode, the numeric right-hand touch keys allow the programmer to enter instruction, input, output, and step identifier numbers and the value of time, or count parameters. Any numeric value to be entered must be preceded by the pressing of one of the command keys on the left-hand touch key area. For the convenience of the programmer, each numeric touch key has its corresponding instruction label printed on it. This appendix lists the input and output number assignments as a reference to the program in Appendix B. Programming will be documented in another document.
| No | Instruction | Brief Definition |
| 0 | NO OP | Causes the Controller to bypass the step in which it appears |
| 1 | Set Loop Counter | This instruction must be used with either Loop Back or the Event Counter to set the number of repetitions of a sequence of operations. |
| 2 | Loop Back | Must be preceded by a Set Loop Counter instruction. Loop Back causes the program to go back to the step preceding the one specified by this instruction. |
| 3 | Event Count | Counts electrical transitions from OFF to ON states for all inputs independently. |
| 4 | Hold with Outputs | Temporarily stops the program from executing, but keeps activated outputs turn ON, based on various conditions defined by modifiers. |
| 5 | Hold Kill Outputs | Temporarily stops the program from executing, but turns OFF activated outputs, based on various conditions defined by modifiers. |
| 6 | Hold at End | Temporarily stops the program execution at the end of a step, based on various conditions defined by modifiers. |
| 7 | Branch at End | Causes the program flow to branch to some other step of the program from the end of the current step, based on conditions defined by modifiers. |
| 8 | Branch During | Causes the program flow to branch to some other step during execution of the current step, based on conditions defined by modifiers. |
| 9 | Hold at Start | Causes the program execution to temporarily stop at the beginning of the current step based on modifiers. Used at the beginning to wait for the user to push “START” |
| No | Function |
| 1 | Door Sensor |
| 2 | Spray Arm Sweep Count |
| 3 | Brush Arm Sweep Count |
| 4 | Spray Arm Home |
| 5 | Brush Arm Home |
| 6 | Spare |
| 7 | AUTO/MANUAL Mode Switch |
| 8 | Spare |
| No | Function |
| 1 | Spindle Low Speed ON/OFF |
| 2 | Spindle High Speed ON/OFF |
| 3 | Brush-Arm ON/OFF |
| 4 | Ceiling Blow-Off ON/OFF |
| 5 | Spray Arm ON/OFF |
| 6 | N2 Blow-off ON/OFF |
| 7 | Brush rotation Motor ON/OFF |
| 8 | High pressure Pump ON/OFF |
| 9 | Door Latch Enable/Disable |
| 10 | Soap Dispense ON/OFF |
| 11 | Water Dispense ON/OFF |
| 12 | Chamber rinse (Optional) |
| 13 | Exhaust Blower ON/OFF |
| 14 | Spray arm Park |
| 15 | Brush arm Park |
| 16 | Spare, not used |
Appendix B
Active Mask Cleaning Program Listing
UltraTech Corp Masker Washer Programming Programming Sheet
Program Title Mask Washer Program “0” & “1” Date 10/5/2005
| OUTPUTS | INPUTS | ||||||||||||||||||||||||||||||||||
| Program Number | Step No. | Prog. Start | Operation | Instruction | Branch to Step | Min/sec | Time/Count | Spindle on Low Speed | Spindle High Speed | Brush Arm | SPARE | Spray Arm | N2 Blow Off | Brush Rotation | Pump | Door Latch Enable | Soap at Brush | Water at Brush | Chamber Rinse | Exhaust Air | Park Spray Arm | Park Brush Arm | DI Purge | Alarm Enable | on/off (inputs in “on” mode) | Door Open | Spray Arm at Center | Brush Arm at Center | Spray Arm at Home | Brush Arm at Home | Spare | Auto.Manual S/W | Spare | Change Enable | Step Advance |
| 1 | 2 | 3 | 4 | 5 | 6 | 7 | 8 | 9 | 10 | 11 | 12 | 13 | 14 | 15 | 16 | 1 | 2 | 3 | 4 | 5 | 6 | 7 | 8 | ||||||||||||
| 0 | 0 | x | Hold until Start | 9 | x | 1 | x | ||||||||||||||||||||||||||||
| 1 | Test Inputs & Start if OK | 8 | 0 | x | 1 | x | x | x | x | x | x | x | x | x | x | ||||||||||||||||||||
| 2 | H.P Water Clean Cycle | 3 | 5 | x | x | x | x | x | x | x | |||||||||||||||||||||||||
| 3 | Spin Dry N2 | 3 | 6 | x | x | x | x | x | x | x | x | ||||||||||||||||||||||||
| 4 | Park Spray Arm | 3 | 1 | x | x | x | x | x | x | x | x | x | |||||||||||||||||||||||
| 5 | Slow Down | 4 | x | 6 | x | x | x | x | |||||||||||||||||||||||||||
| 6 | Finish | 7 | 0 | x | 15 | x | x | x | |||||||||||||||||||||||||||
| 1 | 7 | x | Hold until Start | 9 | x | 1 | x | ||||||||||||||||||||||||||||
| 8 | Test Inputs & Start if OK | 8 | 7 | x | 1 | x | x | x | x | x | x | x | x | x | x | x | |||||||||||||||||||
| 9 | Soapy Brush Sweep | 3 | 3 | x | x | x | x | x | x | x | x | ||||||||||||||||||||||||
| 10 | DI Brush Sweep | 3 | 4 | x | x | x | x | x | x | x | x | ||||||||||||||||||||||||
| 11 | Park Brush | 3 | 1 | x | x | x | x | x | x | x | x | x | |||||||||||||||||||||||
| 12 | Pressure Wash | 3 | 3 | x | x | x | x | x | x | x | |||||||||||||||||||||||||
| 13 | Spin Dry N2 | 3 | 6 | x | x | x | x | x | x | x | x | ||||||||||||||||||||||||
| 14 | Park Spray Arm | 3 | 1 | x | x | x | x | x | x | x | x | x | |||||||||||||||||||||||
| 15 | Slow Down | 4 | x | 12 | x | x | x | x | |||||||||||||||||||||||||||
| 16 | Finish | 7 | 7 | x | 15 | x | x | x | |||||||||||||||||||||||||||
* x indicates that the input or output is active
Program Author: Roger Robbins