In order to accurately describe technical details about the imaging parameters for your publication, you may include following information:
Type of system/microscope (e.g. Olympus FV3000RS)
Objective you used (e.g. UPLSAPO 100X Silicone oil, NA 1.35)
Wavelengths of excitation and emission (e.g. 488 nm line of laser and emission range 500-550 nm)
Detector (e.g. GaAsP detector)
Software for acquisition (eg Fluoview Acquisition & Analysis Software) and general typical settings (e.g. ND, exposure time, binning, interval in t and z, sequential or parallel acquisition, temperature, imaging buffer)
Details of any image processing or analysis procedures (e.g. thresholding, colocalisation, counting, etc.)
Acknowledge and thank Olympus Discovery Center/Imaging Core facility at UT Dallas for providing equipment and support.
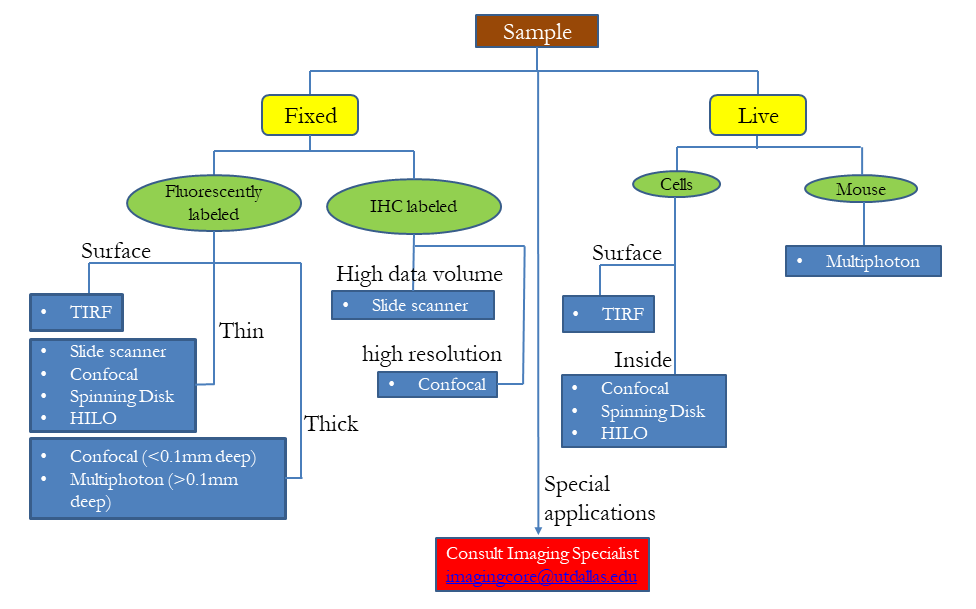
Choosing the right microscope is similar to selecting the right vehicle for a trip. As with different vehicles (bicycle, car, submarine, airplane, etc.), each microscope has its own capability and application. Based on the resources available, consider the end goal of your project to determine the right microscope to fit your needs.
A flowchart of logic on “how you can choose the right microscope” best suited for your needs is depicted in picture below. Basic parameters you may consider are:
Dead or alive
Type of stain
Sample thickness
Field of view
Optical resolution
Sample quantity
qualitative or quantitative
If your experiments are not working or you have an application that is non-conventional, feel free to reach out to the Imaging Core to schedule a free consultation.
The two videos summarize the material that is described above and will also show you how correct choice of microscope, sample preparation, and data analysis protocols can dramatically accelerate your scientific research.
When the login panel appears, click on Registered User, then enter your NetID and Password
During data acquisition, make sure the data storage destination folder is located on D:/ or E:/ and NOT on the system drive C:/. The system drive is only 100 GB on most instrument computers and is meant to store program files only.
Once you are done with the data collection, cut the data folder and move it to your folder on network storage.
The use of USB devices such as flash drives or hard drives is discouraged. These devices can bring viruses onto the RCF computers which can lead to software corruption or data loss.
Data older than 30 days stored on equipment computers will be deleted automatically without intimation.
Macro Programming
Please go here for more information on image processing automation using Fiji (ImageJ).
Troubleshooting
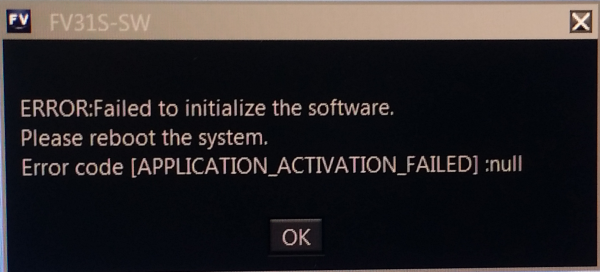
Error starting acquisition software in on FV3000RS
The workspace folder for the users may have been corrupted. Please go to the following folder:
Within the above, delete the “Workspace” folder. Be sure you are specifically in the account of the user who is having trouble. You may have to enable “show hidden folders” via the control panel in order to find the folder above. Upon deleting the folder above, restart the computer and then log back into the user’s account. Try to log back into the software to see if that fixes the problem.
Also, please confirm that the C:/drive is not full.
Z-motor Not Working
Usually this happens when:
Hardware software communication fails. To reestablish the communication, restart all the components including computer.
Sample holder collides with adjacent microscope objective and rotates turret to push microscope objective out of light path. Usually it occurs while imaging wells near the edge of 24 or 96 well plate. Remove the sample, make sure there is enough clearance between objective and sample holder. Shift to another objective and return back to the one you were using. This should reset the objective in correct position. If it still doesn’t work, restart the entire microscope system including computer.
Unable to get a Focused Image
If you are able to see a blurred/out-of-focus image and have tried all z-positions, but you were still not able to get a crisp focused image:
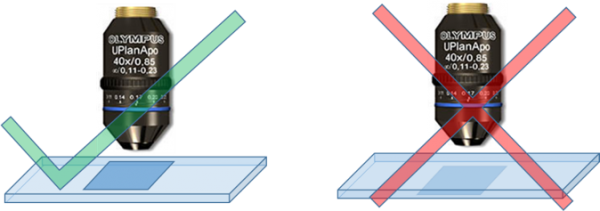
Check the orientation of slide. As shown in the figure below, the coverslip should be face the objective lens. If the previous user has turned the correction collar from its usual position to match a 0.17 mm tick coverslip, you may get a blurred image. Try adjusting the correction collar to get a better image. Lastly, similar problems happen if you are imaging through other materials like tissue culture flask/petridish. You would need to use a longer working distance objection (lower magnification) and adjust correction collar to compensate for refractive index mismatch.
Microscope objective may not be clean. Use lens cleaning tissue and sparkle lens cleaning solution to clean the objective. A useful article on this topic can be found on this here.
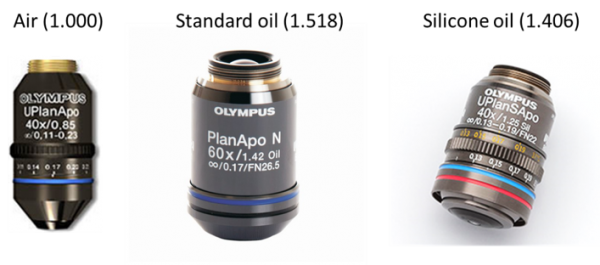
You may be using incorrect immersion medium for the lens. You should NEVER use oil/water on an air objective. Read the microscope objective description on the objective or look up on the corresponding microscope details page to identify correct immersion medium. Further, there are two kinds of oil objective that are available on the microscopes. Green bottle contains silicone oil (refractive index = 1.406) while blue bottle contains standard immersion oil (refractive index = 1.518). Microscope objectives on FV3000RS and spinning disk microscopes are silicone oil objectives (red color ring close to tip of objective), while that on TIRF microscope is standard immersion oil objective (black color ring close to tip of objective). Details about various color codes for magnification and immersion medium can be found on this here.
Sometimes air or water bubbles may get trapped in immersion medium or water may condense on the coverslip surface if sample is colder than room temperature. Dust particles or finger prints on imaging surface also give rise to similar problems. Clean the sample surface with lens cleaning tissue and retry imaging with correct immersion medium.
Lastly, you may have not installed the sample holder properly. At such instances, remove the sample and sample holder, clean up any residue that is blocking the proper installation, re-install the sample holder, and place the sample correctly.
Invitrogen/Molecular Probes fluorescence spectra viewer is a web-based, interactive wavelength viewer. Very useful for determining degree of overlap between fluorophores.

You must be logged in to post a comment.